Receiving the Package
This was the induction video that we created. We were given a certain set of criteria that had to be completed. This criteria involved various techniques to help introduce us to creating our own short films, and to make sure that we understood each of the shots we were learning about.
Mise-en-scene:
Mise-en-scene is what is in the background of the film, how the scene is made and what aspects make up the scene which is relevant to the story of the film. In ours, we didn't include any props throughout the film in the background until it came to the final shot. In the final shot, we had a single rubber toy in it, to give the viewers a hint of what the package was. There was also a plastic tub, which the duck was going to be placed into.

This is the example of Mise-on-scene. At the bottom of the screen, you have a blue rubber whale and a plastic tub with some water in it.
Lighting:
Lighting refers to what lights were used to create the exposure during a film. All of our lighting was natural lighting, as we didn't add artificial lights to make the scene brighter is any of our shots. Many of our shots were inside, meaning that the exposure wasn't difficult to control, however, there was a few scenes where the exposure became too much, and the lighting was disturbed. One of these scenes was after Jamie had put on the blazer and was walking out the of the door.
Because the camera was set on auto, the exposure changed dramatically as he walked out, causing problems for the scene, and making it over-exposed.
One place where lighting was good in ours was during the starting scene, with the phone call.

During this scene, the lighting is good, as nothing is over exposed, and the low colour creates the effect that something mysterious is going on. Everything in the scene is perfectly exposed, with no problems with something being too light.

This is when the exposure was too high. The background was completely white, which caused problems, and made the point of the scene harder to see.
High or Low Camera Angles:
High or Low camera angles are used to create the effect of how much power and how they are feeling. When it is a low camera angle, the person that the camera is focused on is presumed to be powerful, or have a lot of authority; when it is a high camera angle, the person is presumed to be weak, and no have any authority or power.
We only used one type of camera angle - the low camera angle. This camera angle gives the impression that an individual has a lot of power and authority. Because he was important during the film, this helped give the viewers the same feeling.

This is an example of the low camera angle that we used.
Different Shot Distances:
Different shot distances refers to how close or far some of the shots are in the film. Different distances can be used to show some detail of a person, or create an establishing shot for the film.
We had both a close up and a long distance shot. The long distance shot was used to establish what time of day it was, and what the conditions were like during the film.

This is the shot used at long distance. The shot was a time lapse of clouds moving past.
The other shot we did was a close up, which we did in multiple areas. One of these was on the face of someone who watched the package be exchanged.

The close up on the person who watched the package exchange. It was meant so that you could get a good look at his face, without everything being blurred. the detail is made to be crisp.
Fades or dissolves refers to editing techniques that can change how the final piece comes together. Fades are used to show something coming to an end. Because it is a slower transition than black to white, it goes well with slow paces scenes. The fade can also can signify a time gap, such as a long period of time.
Dissolves are also referred to as cross fades. A dissolves work with one image slowly becoming more transparent, where the other one before it slowly fades out. Dissolves can stand for thoughts or for dreams, but can also show a time gap between the two scenes.
We used one dissolve at the start of the film, with the establishing shot moving into the story of the film. It is used so that you can tell that there is a time different between the establishing shot and when the story begins.
 This is our dissolve that we used. As you can see, the clouds, which were the establishing shot, are fading out and the next scene is coming in, creating this effect.

This is an example of the fade that we used during our film. As you can see, the scene on the left gets darker, before a 1 second of black, and then moving into the next scene - the one below.
We used the fade to show the time difference of him walking to the trade, and him actually receiving the package.
One problem with the fade is that the first scene had a much longer fade time than the second, instead of it being even. This made it look slightly odd, as the second scene should have came in the pace that the scene one went out.


 This is the POV shot that we used in our film. It shows someone answering the phone as they get a phone call. One problem that could be noted with our shot of this is that you can see the person holding the camera in the phone, as the screen is reflecting back.

Fades or Dissolves:
Fades or dissolves refers to editing techniques that can change how the final piece comes together. Fades are used to show something coming to an end. Because it is a slower transition than black to white, it goes well with slow paces scenes. The fade can also can signify a time gap, such as a long period of time.
Dissolves are also referred to as cross fades. A dissolves work with one image slowly becoming more transparent, where the other one before it slowly fades out. Dissolves can stand for thoughts or for dreams, but can also show a time gap between the two scenes.
We used one dissolve at the start of the film, with the establishing shot moving into the story of the film. It is used so that you can tell that there is a time different between the establishing shot and when the story begins.


We used the fade to show the time difference of him walking to the trade, and him actually receiving the package.
One problem with the fade is that the first scene had a much longer fade time than the second, instead of it being even. This made it look slightly odd, as the second scene should have came in the pace that the scene one went out.
The Continuity System:
180 Degree Rule:
The 180 degree rule is about keeping the continuity correct during a film. To do this, the camera must stay on one side of the people in the shot, especially if they're having a conversation or something. Id the line is crossed, the people have look like they have changed places, and if people are walking, they may seem to be walking in a different direction from what they were walking originally.
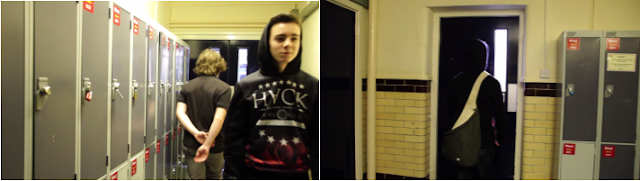
This is an example of the 180 degree rule during our film. as you can see, in the two scenes, the camera is made to show him walking in the same direction, so that the continuity isn't broken. You can tell this is the case because the fact that the person with the package had his right shoulder on the left, and in the second scene, his right shoulder is on the right, meaning that he is still walking the same way, and there isn't a continuity error.
Establishing Shots:
Establishing shots are used to show the audience the setting of the film, so they can understand where it is set, and what the conditions of the day are.

Our establishing shot in our film was a time lapse of the clouds. We used this to show what the conditions of the day were like, and show the audience that it would be a normal day during the film.
Match Cuts of Actions:
A match on action show is where two scenes transition, so that the second scene shows what comes after the first scene, but in much closer detail. An example of this would be a person getting into a car in the first scene, and then the second scene be them turning the keys in the ignitions.

This is an example of the Match on Action shot during our film. In the first scene, you can see the person answering the phone, and in the second shot, he pulls it up to his ear and listens to what has to be said. The second scene is more zoomed in, so conceal the identity of the person; it also makes the phone the center of the shot, which was the point.
POV Shots:
POV shots means "Point of View" Shots, meaning that what you see through the camera is what the person in that situation would be seeing. These can range from people answering something or picking up an object, or looking at someone, so you see them from their perspective.

Shot-Reverse Shot:
The Shot-Reverse shot refers to where you get a shot over someone's shoulder, and then get another shot over the other persons shoulder. These are usually used during package exchanges, do show both parties.

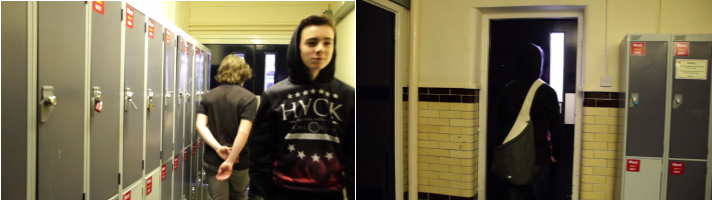
The picture shows the shot-reverse shot that we used during our film. as you can see in the first shot, that it is over the person wearing the blazers shoulder, and in the second, it is over the person's with the package. To make sure that there wasn't any continuity errors, the camera was kept on the same side of the two people.
Evaluation:
Overall, I believe are short film went well, but there were a few parts that could have been improved to make it better. The next time we do a short film, we would change it so that the camera wasn't on auto, and you didn't get the major exposure of light that we had in one scene. another thing that we would do is make sure that we had everything planned out, with enough content to cover the time.
When we first decided on the film, and recorded everything, we only had enough footage for 38 seconds of film, which was too short, so we managed to think of a different plot that allowed us to add some time to the film, and overall, improve the quality.
I enjoyed the project, but we would need to more organised for the next time, so that we don't have the mishaps that occurred in this one.
No comments:
Post a Comment